Performing your own upgrade
Last updated: July 29, 2026
While amplo Support is always available to assist with upgrading to the latest version, agencies may choose to complete upgrades on their own. Each release includes installation links and configuration steps that must be followed to ensure your system continues to operate correctly.
Note: If you prefer Support to perform the upgrade, schedule time on the upgrade calendar.
Available packages
The versions listed below represent the most current releases available for each package. Please note, your agency may not have purchased the all modules, so some packages may not apply to your environment. If you’re unsure which packages apply to your org, contact support@amplo.com.
Package | Purpose |
VerunaCore | The foundational amplo package. This is the core system architecture and includes all standard data models, workflows, policy servicing tools, and AMS functionality. All customers have VerunaCore installed. |
A third-party financial management and general ledger system. Agencies who purchase AccountingSeed use it for billing, payables, cash receipts, financial statements, and full accounting workflows. (Not all customers license this package.) | |
VRAS | The Veruna–AccountingSeed integration layer. VRAS converts amplo policy, billing, and commission data into the formats and structures required by AccountingSeed. It enables seamless financial posting between the two systems. |
A document generation and e-signature partner solution. S-Docs is used for creating ACORD forms, proposals, certificates, and other templated documents directly within Salesforce without external systems. |
Prerequisites
If your current version is earlier than 2.5 (1.945), this step provides instructions for adding new field values that are necessary for renewals in later system versions. All versions later than 2.5 should proceed to the Installation Link section.
Versions before 2.5, including: Winter 2023, Fall 2023, 2.1, 2.2, 2.3
Navigate to Setup → Object Manager.
Locate the Job Queue object and select it.
Click on Fields and Relationships and find the Job Subtype field.
Scroll down to the Values section and click New:
Setup
UmbrellaPolicyData
GL-Policy_Data
BOP-Policy_Level_Coverage
CL-AUTOB_Vehicle_Level_Coverages
Coverage
PL-Vehicle
PL-Schedule
Schedule
RelatedPlan
OpenCargoTruckersMotorCarriers
WCStateRatePremiumInfo
NonReportableACORDFields
SupplementalPolicyInformation
SubmissionPolicy
PaymentPlansAuditFrequency
PL-UnderwritingInformation
PL-CoverageOptions
CL-UnderwritingInformation
CL-CLD
CL-CoverageOptions
WorkersComp
BenefitPlanClick Save.
Click on Fields and Relationships and find the Job Type field.
Scroll down to the Values section and click New:
ClonePolicyQueueHandlerClick Save.
Installation links
The versions listed below represent the most current releases available for each package. Please note, your agency may not have purchased the all modules, so some packages may not apply to your environment.
Package | Version number | Installation links |
VerunaCore | 1.991 | |
VRAS | 1.239 | |
AccountingSeed | Spring '26 | |
S-Docs | 8.0.12 |
Note: Be sure to confirm that each of the package is successfully installed prior to moving to the upgrade steps.
Upgrade actions
Upgrade actions are the administrative configuration tasks that must be completed by amplo (Salesforce) admins each time a new release goes live to maintain stability, security, and full product functionality.
Locating your version number(s)
From Setup, search and select Installed Packages.
Find the current version number in the Version Number column.

Packages
amplo
Follow the instructions from the version immediately after your current version, and complete all steps through to the current version. If you are installing from 2.5 and moving to 2.8, you would complete the steps for 2.5, 2.6, 2.7, and 2.8. If you don't see your version number listed, please contact support@amplo.com.
Version 2.5 (1.945)
If you are using either VerunaDocs or eDocs, these steps are mandatory.
Navigate to Setup → Remote Site Settings
Click New Remote Site and add the values:
Name: VerunaDocs_OF_Secure
Remote Site URL: https://vrsfserviceprod-aya9bgaghuenb4ea.eastus-01.azurewebsites.net
Click Save.
Navigate to Setup → Trusted URLs.
Click New Trusted URL and add the values:
API Name: VerunaDocs_OF_Secure
URL: https://vrsfserviceprod-aya9bgaghuenb4ea.eastus-01.azurewebsites.net
Check all the boxes within CSP Directives
Click Save.
Navigate to App Launcher → VerunaDocs Setup.
Click the Salesforce Setup tab.
Select Settings → Edit and update:
Click Save.
Navigate to Setup.
In Quick Find, search "App Manager"
Locate the VerunaDocs app → View → Edit.
In the Oauth Section, update:
Click Save → Continue.
Navigate to Setup.
In Quick Find, search "Custom Settings"
Locate VerunaDocs Settings → Manage.
Click Edit next to VerunaDocsUrl and update:
OFController Override URL: https://vrsfserviceprod-aya9bgaghuenb4ea.eastus-01.azurewebsites.net
Click Save.
Version 2.6 (1.946)
These steps remove a field that was unintentionally included in the package and must be completed in Classic view.
Click View Profile → Switch to Salesforce Classic.
From the Classic view, enter Setup.
On the left panel under the Build section, navigate to Objects.
Locate and select the Policy object.
Find Test 1 (VRNA__Test_1__c) and click Del.
Version 2.7 (1.953)
As part of Salesforce’s shift to Flow and Apex, legacy Workflow Rules and Process Builders may be unintentionally reactivated during upgrades.
Verify all deprecated / obsolete Process Builders are inactive.
This upgrade also includes a required step that updates the ACORD protected custom setting with the new OfficeScope header token. This step must be completed by amplo Support.
Please schedule your upgrade so that we can perform this upgrade action. If amplo Support does not already have access to your environment, grant them temporary Admin access.
Version 2.8 (1.957)
amplo Custom App brand
The following steps provide instructions for adding the optional new amplo branding. If your organization has custom branding, you do not need to complete these steps.
Navigate to Setup.
Search "App Manager" in Quick Find.
Find the Veruna App with LightningVeruna as the Developer Name in the App list.
Click Edit in the dropdown on the right hand side of the LightningVeruna app.
Make the following changes on the App Details & Branding page (should be the one showing after clicking Edit):
App Name: amplo
Primary Color Hex Value: #003933
Click Clear below the Veruna Logo and upload the amploIcon.png image from this google drive location.
Check the box for Use the app’s image and color instead of the org’s custom theme.
Click Save.
Rewrite button update
The following steps provide instructions for adding the Rewrite button to page layouts. This button should be added to layouts for written/bound policies, specfically for:
VRNA Written Benefits
VRNA Written CL Policy - Account Manager
VRNA Written PL Policy - Account Manager
Go to Setup → Object Manager → Policy → Page Layout.
Select a page layout to add the button to, and edit the page layout.
Then navigate to Mobile and Lightning Actions.
Find the rewrite button.
Drag it to the page layout.
Save.
Job Queue Picklist updates for certificate renewal
Navigate to Setup → Objects → Job Queue → Fields & Relationships.
Add the following values to the fields on the Job_Queue__c object:
Job Type:
CloneCertificateQueueHandlerJob SubType:
CertificateAdditionalInterest
Version 2.9 (1.969)
Adding System Tab to Policy Page
1. Open the Policy Page Layout Editor
Go to Setup (gear icon in top right)
Go to "Object Manager"
Click Policy
Click Lightning Record Pages on the left
Find "VRNA Policy Page" (or your main Policy page)
You may have more than one default, if you need to know which page to update click on View Page Assignments and use the page that is the Org Default.
Click Edit
2. Add the System Tab
In the Lightning App Builder, look for the existing tabs area (you'll see tabs like "Details", "Schedules", "Coverages", etc.)
Click on the component that is filtered for Written Policies
Click Add label on the right side:
Set Label to "System"
Leave other settings as default
Click on the new System Tab in the Canvas
3. Add the Job Queue Component
In the custom component list, find and select jobQueueStatus and drag into the new tab
4. Save and Activate
Click Save (top right)
Click Activation (top right)
Make sure it's assigned to the right App and User Profiles
Click Save
Update Job Queue picklist values
Navigate to Setup → Object Manager.
Locate the Job Queue object and select it.
Click on Fields and Relationships.
Locate the Status field select it.
Scroll down to the Values Section and select click on New.
Add the Ready picklist value.
Click Save.
Go back to the Fields and Relationships.
Locate the Job Subtype field and select it.
Scroll down to the Values Section and select click on New.
Add the following values:
NamedInsuredsDBAs
AI-Relink
Click Save
What Users Will See
A new System tab on Policy records
Two sections showing job queue status:
Renewal Processing Jobs - Shows renewal-related background jobs
Other Policy Jobs - Shows other policy processing jobs
Restart buttons for admins to fix stuck jobs
Auto-refresh every 5 seconds
Deactivate Flow and Workflow
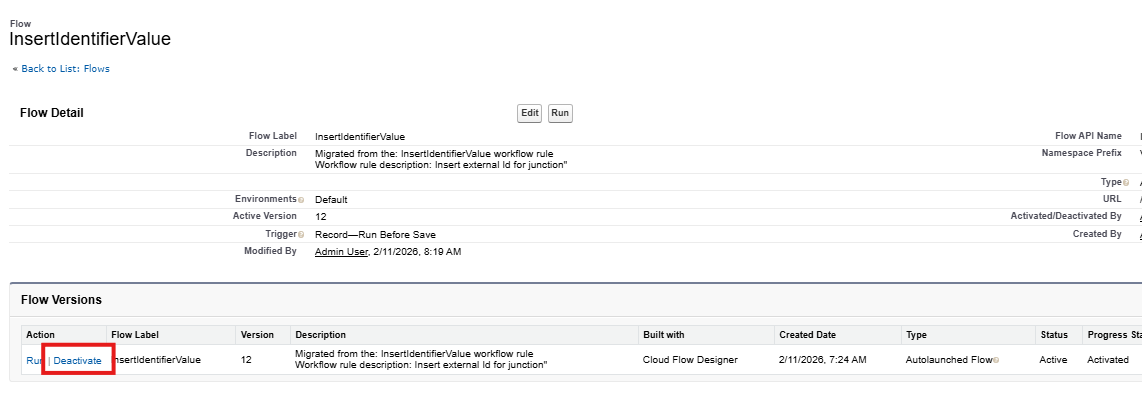
Go to Setup → in quickfind search Flows and select it
Locate (Deprecated) InsertIdentifierValue. (may also just be named InsertIdentifierValue)
Click the carrot on the right side and select View Details and Versions.
Select Deactivate.
Delete old InsertIdentifierValue Workflow Rule
Go to Setup →in quickfind search Workflow Rules and select it.
Locate InsertIdentifierValue and click Del.

Deactivate old Default Global Certificate details Workflow Rule
This has been moved to a new flow and is active on install. Need to deactivate the old workflow rule.
Go to Setup →in quickfind search Workflow Rules and select it.
Locate Default Global Certificate details and click Deactivate.

Add Policy Tab back in
Policy tab was accidentally removed from Verunacore in the amplo app in a previous release. This is being added back in the amplo bridge package, and can’t be added in the VerunaCore. We need to manually create and then add the Policy Tab back in to the amplo app.
Create the policy Tab
Navigate to Setup → Tabs and select it.
In the Custom Object Tabs click New.
Add the following:
Object - Policy
Tab Style - Any is fine, but remember which you chose.
Click Next.
Leave default settings and Click Next again.
Leave default settings and Click Save.
Adding to the amplo App
Navigate to Setup → App Manager and select it.
Locate the amplo app and from the carrot to the right select Edit.
On the left panel click on Navigation Items.
Locate the new Policies Tab you created and move it to the Selected Items.
Click Save.
Version 2.10 (1.973)
Custom Schedule Mappings
For Custom schedules, a mapping may need to be created.
Navigate to App Launcher → Schedule Mappings. There should be five Schedule Mappings.
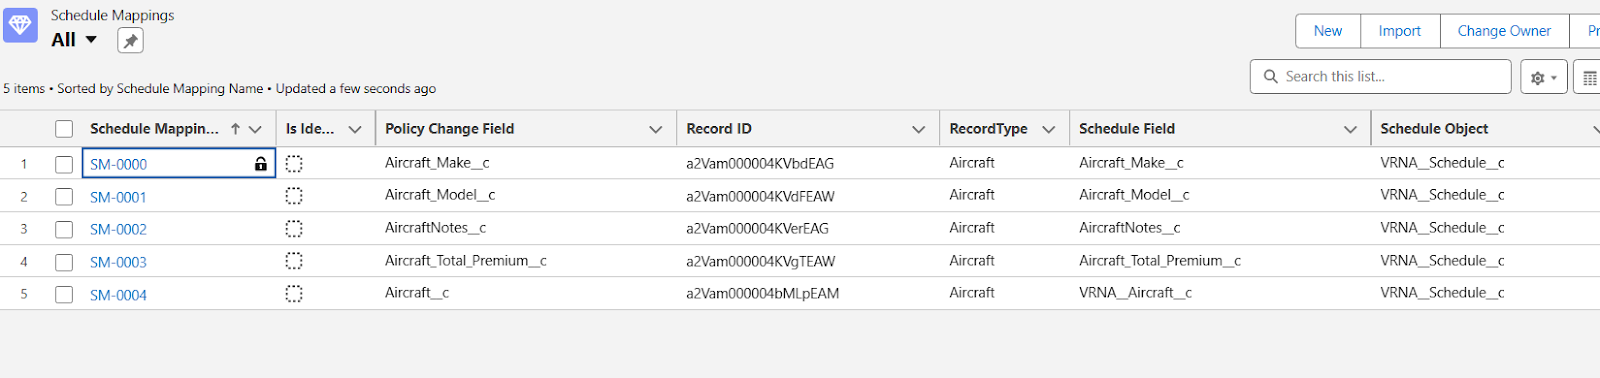
If there are only 4, Aircraft may be missing. If missing, follow the steps below to create the Aircraft field on the Custom Schedule object.
Navigate to Setup→ Object Manager.
Locate and select Custom Schedule.
Click on Fields & Relationships.
Verify custom field called Aircraft exists.
If not click on the New Button
Select Text field type and click Next
Add the following fields exactly as below
Field Label = Aircraft__c
Length = 255
Field Name = Aircraft__c
Click Next
Click Next Again
Click Save
Create the new mapping record
Navigate back to App Launcher → Schedule Mappings.
Click the New button.
Update the fields with the following:
Is Identifier? = Unchecked
Policy Change Field = Aircraft__c
RecordType = Aircraft
Schedule Object = VRNA__Aircraft__c
Schedule Field = VRNA__Schedule__c
Click Save.
Version 2.12 (1.985)
Amplo Setup page
Click the App Launcher in the top left corner of the page (the grid of nine dots).
Type Amplo Setup in the search bar and click Amplo Setup in the results.
Click Setup Missing Configurations to create all necessary settings.
Remove unused settings
Go to Setup > Remote Site Settings.
Locate VerunaDocs_OF_Secure. If two entries share the same name, click Del next to the one without the VRNA namespace. If only one entry exists, skip this step.
Locate ApexDevNet in the list and click Del.
Go to Setup > Trusted URLs.
Locate VerunaDocs_OF_Secure. If two entries share the same name, click Del next to the one without the VRNA namespace. If only one entry exists, skip this step.
Add the Forms related list to the Account Holder layout
Go to Setup > Object Manager and find Account Holder.
Click Page Layouts, then click Account Holder Layout.
Click Related Lists and drag Forms onto the page below Operations Descriptions.
Click the wrench icon and add the Acord Form Type and Account fields to the Selected Fields.
Click OK.
Add the Master Certificates button to Account layouts
Go to Setup > Object Manager and find Account.
Add the Master Certificates button to the following layouts, placing it after the COI/Evidence button:
Business Account – Customer
Business Account – Suspect/Prospect
Individual Account – Customer
Individual Account – Suspect/Prospect
Add the View Form button to the Form object layout
Go to Setup > Object Manager and find Form.
Add the View Form button to the Form Layout. Note: If the Salesforce Mobile and Lightning Experience Actions section doesn't allow you to drag the button, click Override the predefined actions. Remove all buttons except Edit and Delete, then add the View Form button after Edit.
Add "Waiting" to the Amplo Job Queue Status field
Go to Setup > Object Manager and find Job Queue (IAMP namespace).
Add "Waiting" as a value to the Status field.
Troubleshooting Forms OAuth handshake
If you see an error page when opening the Forms App from Salesforce after ECA has been enabled, clearing your browser cookies should resolve the issue.
Right-click the popup and select Inspect.
In Chrome Dev Tools, select the Application tab.
Under Storage in the left menu, expand the Cookies section.
Right-click the entry and select Clear.
The Forms App should now open successfully.
.NET download authentication
Once the feature flag is enabled, .NET automatically picks up the External Client App credentials — no additional action is required.
The user added to the ECA in the 2.11 release already has the permissions needed to create and update Download Details, policies, and policy sub-objects such as schedules and coverages.
Note: If the assigned user becomes inactive, refer to the release notes or 📄 Managing the IVANS downloads userarticle for steps on rotating the user.
Version 2.13 (1.991)
VRAS/Accounting Seed upgrade steps
Before installing
Confirm that Allow Activities and Track Field History are enabled on the GL Account Mapping object before starting the upgrade. If they aren't, the Spring '26 upgrade will fail.
To check and enable these settings:
Click the gear icon and select Setup, then click Object Manager.
Type "Mapping" in the Quick Find search box.
Click GL Account Mapping in the search results.
On Details, click Edit.
Scroll down to the Optional Features section.
Check both checkboxes for Allow Activities and Track Field History.
After installing
Re-enable Large Data Optimizer (LDO)
If your org uses Large Data Optimizer, you'll need to re-enable it after upgrading to Spring '26. To confirm whether LDO is enabled in your org, go to Accounting Home > Setup > Configurations and click Enablements. If this setting isn't available, skip this step.
If LDO is available in Enablements:
Go to Accounting Home > Setup > Configurations and click Enablements.
Click the pencil icon to edit.
Scroll down to the Large Data Optimizer section.
Enable the fields needed so your users can continue to post and unpost source documents without interruption.
Configure field sets in the Financial Reports Hub
To make custom fields available as columns or filters in the Financial Reports Hub report grid, configure the following field sets on the Transaction object.
Go to Setup > Object Manager > Transaction.
Select Field Sets from the left panel.
Choose the field set you want to modify:
To add a custom field as a column, select a field set with "Column" in the name.
To add a custom field as a filter, select a field set with "Filter" in the name.
Click Edit from the dropdown on the right.
Drag the custom fields you want to make available into the field set.
Click Save.
Repeat for any additional field sets you want to configure.
On the Data Manager tab, refresh the report groups to apply the field set changes.
Activate the EDocs Download Detail Lightning Record page
Go to Setup > Object Manager > EDocs Download Detail.
Click Lightning Record Pages in the left sidebar.
Find the page named "EDocs Download Detail" and click View.
In Lightning App Builder, click Activation.
On the App, Record Type, and Profile tab, assign the page to the Lightning app that hosts the existing Policy Download Detail page in your org.
Click Save.
Add new values to the EDocs Download Detail Status field
Go to Setup > Picklist Value Sets.
Find eDocs Status Values in the list and click the name.
In the Values section, click New.
Add Matching and Processing as values in the text box.
Click Save.
AccountingSeed
For detailed instructions on how to upgrade Accounting Seed, refer to 📄 Upgrading AccountingSeed packages.
Troubleshooting
If you encounter issues during the upgrade process, follow these steps to diagnose and resolve them efficiently:
Verify prerequisites. Before installing any package, ensure all prerequisite steps listed in the release notes have been completed. Missing a prerequisite is the most common cause of upgrade failures.
Install packages one at a time. Install each package individually and monitor progress in Setup → Deployment Status.
Review error messages carefully. If Salesforce displays an installation error:
Expand the error details in the deployment log.
Look for references to missing fields, permission issues, Apex test failures, or validation rules that may be blocking the install.
If you’re unsure how to interpret the message or what action to take, please submit a case to support@amplo.com for assistance.